| Game Development 101: (incomplete) a. Basics of Game Development b. Designing your Video Game c. Math in Video Games d. AI Decision-making & Pathfinding e. Asset Creation & Game Art f. Physics & Collision Detection g. Shaders & VFX in Games h. Multiplayer & Networking in Games |
Prerequisite
Basic programming skills & logic-building. Before reading this, if you are a complete beginner, I suggest you start with making games 101 article.
GameDev in Nutshell
Game development process involves coming up with an idea, thinking hard to see if its feasible, designing your game, writing story, choosing development technologies, making art, coding it, adding sounds & music, adding UI interface & publishing it. All of these elements are usually done by separate teams in AAA studios, but can be done by 1 or few persons for smaller games.
We use some images, 3D models, audio, and text to synthesize a game world which we are able to view on the screen using our game camera; one frame at a time. For the complete animation, we have many frames drawn per second to give the illusion of moving animation.
How exactly to synthesize a game world?
Understanding the Bigger Picture
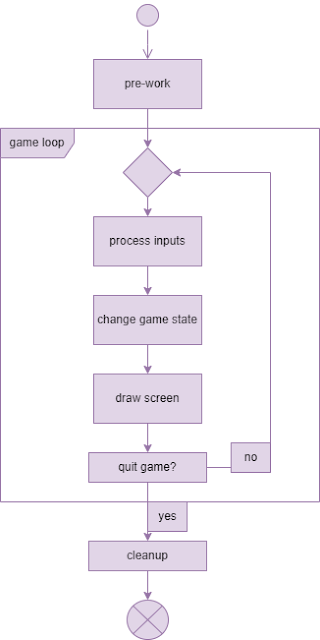
When we start a game, we enter a big while-loop. In this loop, we check for keyboard/mouse inputs, change player positions/states as a result & draw it to screen. At the end of each loop, a frame is drawn. Frame is an image that is displayed on screen that we see.
// game start
precomputation();
while(!exit){
    process_input_events();
    compute_new_game_state();
    draw_to_screen();
}
on_exit();
// game end
In each frame, the computation that occurs is:
- Inputs are processed; that is, we detect input events such as mouse motion or keyboard key press and so on, so we can later move our characters & everything according to this input.
- Game state is changed; that is, the game characters & objects are actually moved & now positions and other variables are updated.
- The updated game state is then drawn to the screen (rendering).
This process happens in a loop, for each frame, until the game is quit. We call this a game loop.
Choosing Our Dev Technology
Game Engines
- I choose Godot Engine as I know it better & its free & open-source.
- Unreal Engine looks like a very good engine for big games.
- Unity is also popular and good.
- For low level LibGDX (Java), PyGame, Arcade (Python).
Game Art Making Tools
- For 3D, Blender. Alternatives include Maya. 3ds Max.
- For 2D, Illustrator, Photoshop or GIMP.
Sounds
- FL Studio
- LMMS (free & open source).
Lets make a Game Now!
The complete game project can be downloaded from here. Unzip/open the folder in Godot & we’ll only focus on key aspects.
Creating our Player
Our player is a png image of a spaceship (a sprite2d). In our player class/scene, we added variables such as my_velocity (a vector2), health (a float). We will move the player using player inputs as follows:
var health = 100
const SPEED = 20
var score = 0
var my_velocity = Vector2(0, 0)

func move(delta):
	if Input.is_action_pressed("ui_up"):
		my_velocity.y -= SPEED * delta
	if Input.is_action_pressed("ui_down"):
		my_velocity.y += SPEED * delta
	if Input.is_action_pressed("ui_right"):
		my_velocity.x += SPEED * delta
	if Input.is_action_pressed("ui_left"):
		my_velocity.x -= SPEED * delta
You see that we are already processing inputs from keyboard at this stage & updating our game state (which is the position of player here).
But we need to call this function somewhere, so we call it in our main game loop, so it will be called every frame.
# In Godot, _process() is called every frame (in game loop).
func _process(delta): # delta is time passed since last frame
	move(delta)
Attach the Camera
What is a Camera?
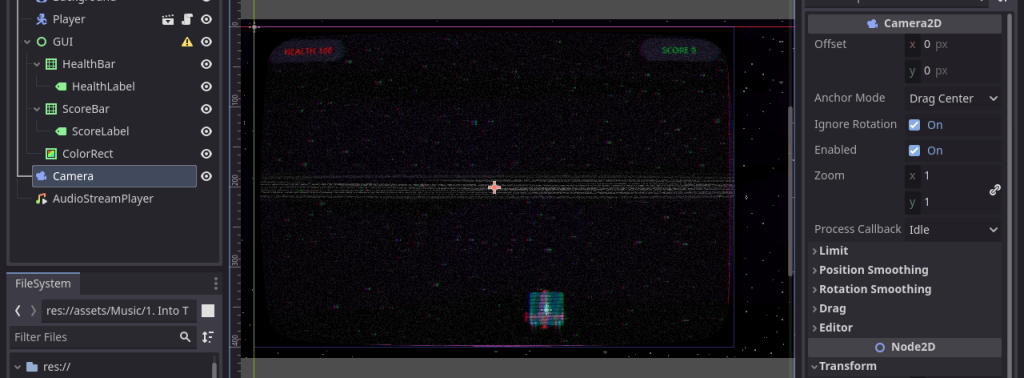
In order to see the game world in our screen, we need a camera. It is like a window through which we see the game world. Usually camera is attached with the player in many games to keep their position in sync so camera moves as player moves. In our game, camera is fixed since player cannot go beyond screen bounds.
In the above image, the green and red lines represent the x and y axes of the coordinate system. It is the world space (any point with respect to these axes are in world space). However, you can see a purple box which is a game camera. When this game is actually run, all we see is whatever is inside the purple box; and we need to move our camera to see other parts of the world.
It is important to note that our screen, too has a coordinate system with origin at top-left. So if you reference any position with respect to screen coordinates, they are said to be in screen space. This property is important as you will later see this thing happening much frequently in shaders.
Adding a Camera to our Game
Godot readily provides a camera class that we can instance directly in editor.
But it can be done in code too:
var camera

func _ready(): # _ready() is called only once on game start
    camera = Camera2D.new()
    add_child(camera)
Spawning Asteroids
Our next target is to create an asteroid object, spawn it above outside the screen bounds, make it move downward, and give it a random velocity. Similar to how we created player, we will make its own scene. In the code, we add this:
extends Area2D

var camera
var SPEED = 32
var ROTATION_SPEED = 32

func _ready():
	camera = get_viewport().get_camera_2d()
	SPEED *= randf_range(1.0, 3.0)
	ROTATION_SPEED *= randf_range(-4.0, 4.0)


func _process(delta):
	self.position.y += SPEED * delta
	self.rotation += deg_to_rad(ROTATION_SPEED * delta)

	if position.y > get_viewport_rect().size.y:
		queue_free()


# Reduce health of player (body), if we intersect it
func _on_body_entered(body):
	if body.has_method("reduce_health"):
		body.reduce_health(50)
Just when the asteroid object is created, we set its SPEED and apply some random variation in _ready(). In _process(), the asteroid is moved downward each time _process() is called. If its position is below the camera’s extent, we just deletes the object from memory.
We also reduce health of any object that has method reduce_health() and has collided/intersected with this asteroid.
Collision Detection
Godot provides a very elegant way to handle collision for both 2D & 3D. We have already used in in our game.
But for understanding, a simple math-based approach is to check if 2 rectangles are intersecting.
func is_colliding(rect1: Rect2, rect2: Rect2) -> bool:
	return rect1.intersects(rect2)
We can use the above method in our game loop to check collision for every asteroid with player, but since Godot already handles it, we can skip it.
Adding Bullets to Player
Bullet is another scene/class that we can instance; set initial position to player’s current position and velocity to the direction the player is looking it.
When a bullet intersects with any object, it deletes it from memory. When it explodes, explode() is called. It starts playing explosion animation. After it has exploded, destroy() is called it is freed from memory.
In player.gd:
func shoot(delta):
	if Input.is_action_just_pressed("mouse_left_button"):
		var this_bullet = bullet.instantiate()
		this_bullet.position = self.position
		this_bullet.direction = Vector2(0, -1)
		this_bullet.who_fired = self
		world.add_child(this_bullet)

func _process(delta):
	move(delta)
	shoot(delta)
In bullet.gd:
func _process(delta):
	if not destroyed:
		self.position += direction * SPEED * delta

		if timer < 0:
			queue_free()
		timer -= delta
	else:
		explode(delta)


func explode(delta):
	if not exploded:
		exploded = true
		$Explosion.visible = true
		$Sprite2D.visible = false
		$Explosion.play()
		$ExplosionSound.play()
		world.shake_screen = true

	if exploded and not $Explosion.is_playing() and not $ExplosionSound.is_playing():
		queue_free()

func _on_body_entered(body):
	if body != who_fired:
		destory(body)


func _on_area_entered(area):
	if area != who_fired:
		destory(area)

func destory(entity):
	entity.queue_free()
	if who_fired != null:
		if who_fired.has_method("increase_score"):
			who_fired.increase_score(1)
	destroyed = true
More Details
Much is going on in the game which can be difficult to understand, but you got the overall idea & you can play with the code to understand it more. In following tutorials, we will look at each aspect individually.
Final Words
You have seen a general overview of how a game is made. In complex games, there is much more detail that we will slowly dig as we move forward. The next part of this series discusses the game design.
| Game Development 101: (incomplete) a. Basics of Game Development b. Designing your Video Game c. Math in Video Games d. AI Decision-making & Pathfinding e. Asset Creation & Game Art f. Physics & Collision Detection g. Shaders & VFX in Games h. Multiplayer & Networking in Games |