This post is part of Godot FPS tutorial series.
Concept: Bringing our weapon system to life. We’ll implement the logic for hitscan weapons (like pistols and shotguns) using RayCasting, handle shooting, and create the “equipped weapon” scenes that live on the player’s view.
In Part 2, we constructed the “engine” of our weapon system: the WeaponData resource and the WeaponManager script. It’s a powerful system, but right now it’s an empty garage with no car in it.
In this tutorial, we’re going to build that car. We will create our first fully functional weapon, a classic six-shooter revolver. This process will show you how the data, scenes, and scripts all connect to bring a weapon to life.
Here’s our plan:
- Create a Base
WeaponEquippedScript: All our equippable weapons will share common logic (like handling ammo, recoil, etc.). We’ll create a reusable base script to avoid repeating code. - Build the Revolver’s Equipped Scene: We’ll create the first-person 3D model for our revolver and write a small script specific to it.
- Implement Hitscan Firing: We’ll write the logic that makes the gun fire a “hitscan” projectile—an instantaneous line trace, perfect for bullets.
- Build the Revolver’s Pickup Scene: We’ll create the 3D model that appears in the world when the revolver is thrown.
- Define the
WeaponData: We’ll create therevolver.tresresource file, fill in its stats, and link our new scenes to it. - Equip the Weapon: The final step—we’ll drag our new resource into the
WeaponManagerand see it all work in-game!
Let’s get started.
The WeaponEquipped Base Script
Our revolver, a future shotgun, and a knife will all share some behaviors. For example, they all need to receive WeaponData from the WeaponManager. To keep our project organized and efficient (Don’t Repeat Yourself!), we’ll create a base script that all our equippable weapons will inherit from.
- In the
Weaponsfolder, create a new script namedWeaponEquipped.gd. - Open the script and add the following foundational code. This will be the parent class for all our weapons.
# WeaponEquipped.gd
class_name WeaponEquipped
extends Node3D

# This signal will be sent up to the WeaponManager when we hit something.
signal deal_damage(damage_amount: int, hit_point: Vector3, hit_normal: Vector3, collider: Object)

# This will hold the data resource for the specific weapon (e.g., revolver.tres)
var weapon_data: WeaponData

# We'll export node paths so we can link them easily in the editor.
@export var weapon_model: Node3D # The visual part of the weapon that will move.
@export var fire_ray: RayCast3D  # The raycast that determines where we hit.

# This variable will be set by the WeaponManager so we know who is shooting.
@export var shooter_body: CharacterBody3D

# This function is the crucial link. The WeaponManager will call this
# right after it creates the weapon instance.
func set_weapon_data(data: WeaponData) -> void:
	weapon_data = data

# This is a "virtual" function. We define it here, but each specific weapon
# script (like our revolver) will provide its own implementation.
func attack() -> void:
	# Base implementation does nothing.
	# The child script (RevolverEquipped.gd) will override this.
	pass
This script establishes a contract. It guarantees that every weapon will have a weapon_data variable and a set_weapon_data function that the WeaponManager can rely on.
Building the Revolver’s Equipped Scene
Now for the fun part. Let’s make the revolver that our player will hold. We’ll use simple box meshes to quickly make a revolver shape for visual display (we can later change that to real 3D model of revolver).
Create a new scene. The root node should be a Node3D. Name it RevolverEquipped.
Save the scene as RevolverEquipped.tscn inside a new folder structure: Weapons/Scenes/Revolver/.
Attach a new script to the root node. Call it RevolverEquipped.gd and save it in the same folder.
Important: Open RevolverEquipped.gd and make it inherit from our new base class:
# RevolverEquipped.gd
extends WeaponEquipped

# We will override the base attack function here.
func attack() -> void:
    print("Revolver goes: PEW!")
# We will call the hitscan logic here soon.Now, let’s build the gun model. Back in the RevolverEquipped.tscn scene, create the following node structure. Don’t worry about perfect shapes, just get the basic form down.
RevolverEquipped (Node3D)
└─ WeaponModel (Node3D)       <-- This will be the parent for all visual parts.
   ├─ MeshInstance3D nodes to make a gun shape
Next, we need a RayCast3D to detect where we’re aiming. Add a RayCast3D node as a direct child of the root RevolverEquipped node.
Name it FireRay.
In the Inspector, set its Target Position to (X: 0, Y: 0, Z: -50). This makes the ray 50 meters long.
Position the FireRay node so it originates from the tip of the barrel.
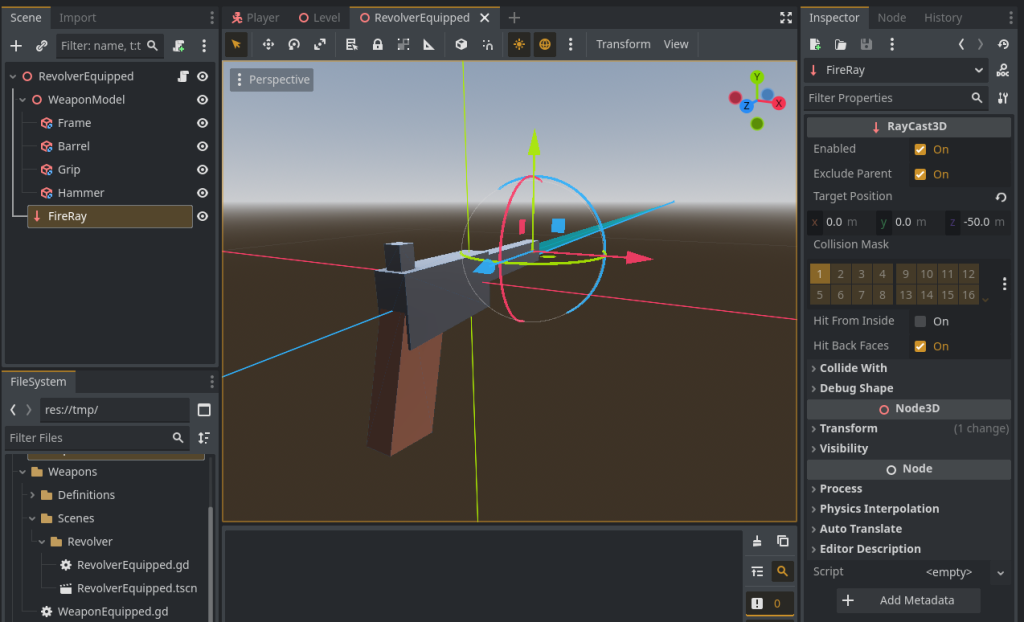
Finally, let’s link everything up. Select the root RevolverEquipped node. In the Inspector, you’ll see the exported variables from our WeaponEquipped.gd script.
Drag the WeaponModel node into the Weapon Model slot.
Drag the FireRay node into the Fire Ray slot.
Our equipped scene is now set up!
“PEW!” – Implementing Hitscan Firing
Let’s make our revolver actually shoot something. We’ll add the hitscan logic to our base WeaponEquipped.gd script so other bullet-based weapons can use it too.
- Open
WeaponEquipped.gd. - Add the following function. Read the comments carefully to understand how it works.
# Add this function to WeaponEquipped.gd

func fire_hitscan() -> void:
	if not fire_ray:
		printerr("Fire Ray not assigned for ", self.name)
		return

	# We get the physics world.
	var space_state = get_world_3d().direct_space_state
	# The query holds the ray's start, end, and any exceptions.
	var query = PhysicsRayQueryParameters3D.create(
		fire_ray.global_position,
		fire_ray.to_global(fire_ray.get_target_position())
	)
	# This is crucial: we tell the ray to ignore the player's body.
	query.exclude = [shooter_body.get_rid()]

	# We execute the raycast!
	var result = space_state.intersect_ray(query)

	# Did we hit anything?
	if result:
		var collider = result.collider
		var hit_point = result.position
		var hit_normal = result.normal

		print("Hit: ", collider.name, " at position ", hit_point)

		# --- Placeholder Impact Effect ---
		# To visually confirm our hit, let's spawn a small red cube.
		var hit_marker = MeshInstance3D.new()
		var box_mesh = BoxMesh.new()
		var material = StandardMaterial3D.new()
		material.albedo_color = Color.RED
		box_mesh.material = material
		box_mesh.size = Vector3(0.1, 0.1, 0.1)
		hit_marker.mesh = box_mesh

		# Add the marker to the main scene tree and position it.
		get_tree().root.add_child(hit_marker)
		hit_marker.global_position = hit_point

		# Send the damage info up to the WeaponManager.
		deal_damage.emit(weapon_data.damage, hit_point, hit_normal, collider)
- Now, let’s call this new function from our revolver. Open
RevolverEquipped.gdand modify theattackfunction:
# RevolverEquipped.gd
extends WeaponEquipped

func attack() -> void:
	# Instead of just printing, we now call the hitscan logic from our base class.
	fire_hitscan()
The Ammunition System
A revolver that never runs out of bullets isn’t much of a revolver! Let’s add the ammunition logic to our base WeaponEquipped.gd script.
- Open
WeaponEquipped.gdand add the new signals and functions for handling ammo.
# Add these signals at the top of WeaponEquipped.gd
signal ammo_changed(current_magazine: int, total_ammo: int)
signal reload_started()
signal reload_finished()

# ... (keep existing variables) ...

# Add these new variables
var reload_timer: Timer

func _ready() -> void:
    # We will initialize things here later
    pass

# ... (keep existing set_weapon_data and attack functions) ...

# Add all of the following functions to WeaponEquipped.gd

# This should be called after weapon_data is set
func _initialize_ammo_system() -> void:
	if not weapon_data or not weapon_data.uses_ammo:
		return

	# If this is the first time, set ammo to full.
	if weapon_data.total_ammo == 0:
		weapon_data.initialize_ammo()

	# Create a timer for reloading
	if not reload_timer:
		reload_timer = Timer.new()
		reload_timer.one_shot = true
		reload_timer.timeout.connect(_on_reload_finished)
		add_child(reload_timer)

	reload_timer.wait_time = weapon_data.reload_time

	# Tell the UI about our current ammo count
	ammo_changed.emit(weapon_data.current_magazine_ammo, weapon_data.total_ammo)

func can_fire() -> bool:
	if not weapon_data: return false
	if not weapon_data.uses_ammo: return true # Melee weapons can always fire
	return weapon_data.current_magazine_ammo > 0 and not weapon_data.is_reloading

func consume_ammo() -> void:
	if not can_fire(): return

	weapon_data.current_magazine_ammo -= 1
	ammo_changed.emit(weapon_data.current_magazine_ammo, weapon_data.total_ammo)

	if weapon_data.current_magazine_ammo <= 0 and weapon_data.total_ammo > 0:
		start_reload() # Auto-reload when the mag is empty

func start_reload() -> void:
	if not weapon_data or not weapon_data.uses_ammo or weapon_data.is_reloading: return
	if weapon_data.current_magazine_ammo >= weapon_data.max_magazine_capacity: return
	if weapon_data.total_ammo <= 0: return

	weapon_data.is_reloading = true
	reload_timer.start()
	reload_started.emit()

func _on_reload_finished() -> void:
	var ammo_needed = weapon_data.max_magazine_capacity - weapon_data.current_magazine_ammo
	var ammo_to_transfer = min(ammo_needed, weapon_data.total_ammo)

	weapon_data.current_magazine_ammo += ammo_to_transfer
	weapon_data.total_ammo -= ammo_to_transfer

	weapon_data.is_reloading = false
	reload_finished.emit()
	ammo_changed.emit(weapon_data.current_magazine_ammo, weapon_data.total_ammo)

func manual_reload() -> void:
	start_reload()

# --- Now, modify set_weapon_data and fire_hitscan ---

func set_weapon_data(data: WeaponData) -> void:
	weapon_data = data
	_initialize_ammo_system() # Call the setup function here

func fire_hitscan() -> void:
	# Add this check at the very beginning of the function
	if not can_fire():
		print("Cannot fire: No ammo or reloading!")
		return

	consume_ammo() # Consume one bullet

	# ... (rest of the fire_hitscan function remains the same)
We now have a complete ammunition system that any future weapon can use!
Building the Pickup Scene
What happens when we throw our revolver? It needs to become a physical object in the world.
- Create a new scene with a
RigidBody3Das its root. Name itRevolverPickup. Save it in the sameRevolver/folder. - Copy the
WeaponModelnode and its children fromRevolverEquipped.tscnand paste them as a child ofRevolverPickup. This ensures our pickup model looks identical to our equipped model. - A
RigidBody3Dneeds a collision shape to interact with the world. Add aCollisionShape3Dnode. - In the Inspector for the
CollisionShape3D, create a newBoxShape3Dfor itsShapeproperty. Resize the box to roughly encapsulate the revolver model. - Create a new script,
WeaponPickup.gd, and attach it to the root node. This will be a very simple script for now.
# WeaponPickup.gd
class_name WeaponPickup
extends RigidBody3D

@export var weapon_data: WeaponData

# This function allows a thrown weapon to pass its current data (like ammo count)
# to the pickup object that gets spawned.
func set_weapon_data(data: WeaponData) -> void:
	weapon_data = data
That’s it for the pickup scene! We are intentionally leaving out the interaction logic. For now, its only job is to be a physical object that holds WeaponData.
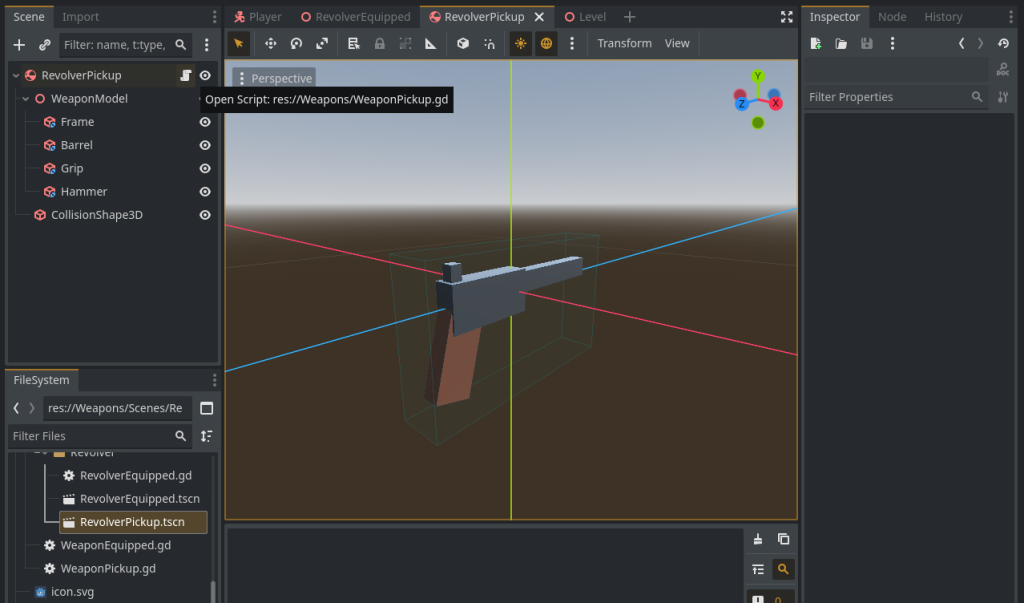
RevolverPickup.tscn looks so far. It has a RigidBody3D root, so it behaves in a physics manner if thrown. – It has a script WeaponPickup.gd attached to it. All weapons’ pickup scenes will have same script attached to them in future.Define the WeaponData and Equip!
This is the final step where all our work connects. We will create the data resource that defines our revolver.
- In the FileSystem dock, navigate to
Weapons/. Right-click and select New > Resource…. - A dialog will pop up. Search for and select
WeaponData. Click “Create”. - Save the new resource as
revolver.tres. - Select
revolver.tres. The Inspector will now show all the@exportvariables from ourWeaponData.gdscript! This is the power of a data-driven system. Fill it out:- Weapon Name: “Revolver”
- Equipped Model Scene: Drag
RevolverEquipped.tscninto this slot. - Pickup Model Scene: Drag
RevolverPickup.tscninto this slot. - Max Magazine Capacity:
6 - Max Total Ammo:
24 - Reload Time:
1.5 - Damage:
25 - (Leave the other values as default for now)
- The moment of truth. Open your
Player.tscnscene. - Select the
WeaponManagernode. - In the Inspector, find the
Weapon Data Arrayproperty. Click “Add Element”. - A new slot will appear. Drag your
revolver.tresresource from the FileSystem into this slot.
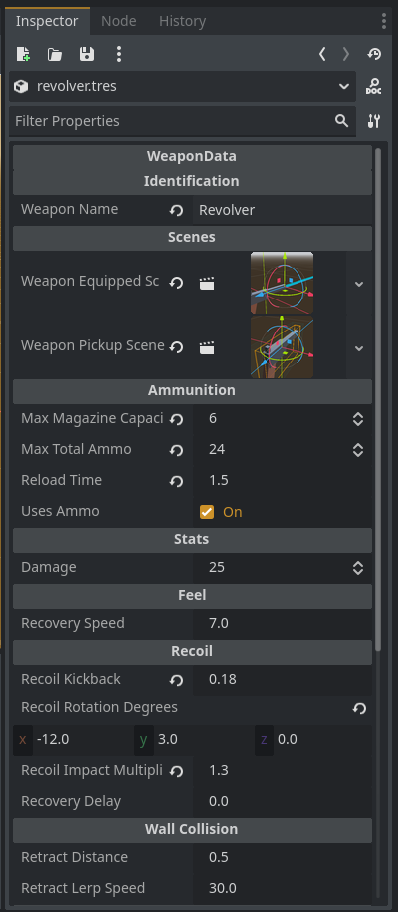
revolver.tres resource looks like. Notice both equip & pickup scenes assigned to it, so whenever WeaponManager gets this resource, it knows what scene to spawn when equipped and what scene to spawn when weapon is thrown to world. Similarly, both equip scene & pickup scene themselves also have a variable to hold this resource so if player fires bullets, all ammo changes will be reflected in real-time in this resource, and when weapon will be thrown in world, state will be preserved.Run the Game!
That’s it! Press F5 to play. You should now see your blocky revolver in front of you.
- Left-click to fire. You’ll see red cubes appear where you shoot, and your ammo count will go down (check the output log).
- After 6 shots, the gun will auto-reload.
- Press R to manually reload.
- Press G to throw your weapon. It will drop to the ground as a physical object. (You won’t be able to pick it up yet).
You have successfully built and integrated your first weapon into the system! Notice how we didn’t have to change the WeaponManager at all? We just gave it a new WeaponData blueprint, and it knew exactly what to do. This is the flexibility we were aiming for.
In the next tutorial, we’ll add slightly more juice to the weapon: recoil & basic hit impact effects.