This post is part of Godot FPS tutorial series.
Concept: This is it. The final piece of our core combat loop. Let’s give our firefights stakes, consequences, and a clear winner.
In our last tutorial, we brought our world to life by creating an AI enemy that can hunt and shoot at the player. We have a proper firefight on our hands, but it’s an immortal one. Bullets fly, impacts flare, but no one ever falls. It’s time to change that.
In this tutorial, we will implement a robust, reusable Health component and integrate it into both our Player and Enemy. This will create a complete combat loop where damage matters and victory is earned.
Here is our final mission plan:
- Create the
HealthComponent: We’ll build a simple, data-driven script that can manage health for any entity in our game. - Connect Weapons to Health: We’ll upgrade our weapon script to actually deal damage to anything that has a Health component.
- Give the Player Health: We’ll add the Health component to our player and script the consequences of running out of it—game over.
- Give the Enemy Health: We’ll do the same for our enemy, making it a mortal foe that can be defeated.
When we’re done, our blocky battleground will be a place of consequence. Let’s arm ourselves and get to work.
The Reusable Health Component
Just like our WeaponManager, we want our health system to be a reusable component, not something hard-coded into the player or enemy.
- In your
Componentsfolder, create a new subfolder namedHealth. - Inside this new folder, create a new script called
Health.gd. - Open the script and paste the following code. This is the entire health system in one file.
# Health.gd
# A reusable health component for both players and enemies
class_name Health
extends Node

signal health_changed(current_health: int, max_health: int)
signal died()

@export var initial_max_health: int = 100

var current_health: int
var max_health: int

func _ready() -> void:
    max_health = initial_max_health
    current_health = max_health

func take_damage(damage_amount: int) -> void:
    # Only take damage if we're alive
    if current_health <= 0:
        return

    current_health = max(0, current_health - damage_amount)
    health_changed.emit(current_health, max_health)

    print("%s took %d damage! Health: %d/%d" % [get_parent().name, damage_amount, current_health, max_health])

    if current_health <= 0:
        died.emit()

func get_health_percentage() -> float:
    if max_health <= 0:
        return 0.0
    return float(current_health) / float(max_health)

func is_alive() -> bool:
    return current_health > 0

func heal(amount: int) -> void:
    current_health = min(current_health + amount, max_health)
health_changed.emit(current_health, max_health)Let’s quickly break down this powerful little component:
- Signals: It emits signals when health changes (
health_changed) or when health reaches zero (died). This allows other scripts (like our Player and Enemy controllers) to react to these events without being tightly coupled. take_damage(): This is its primary input. Any other object can call this function to deal damage. Themax(0, ...)logic is a simple way to prevent health from going into negative numbers.- Reusability: Because it’s a generic
Node, we can attach this script to literally anything in our game to give it a health bar.
Making Our Weapons Deadly
Our weapons can fire, but they don’t yet know how to talk to our new Health component. Let’s teach them. The logic is simple: when a weapon’s raycast hits something, check if that “something” can take damage. If it can, tell it to.
- Open
WeaponEquipped.gd. - Navigate to the
fire_hitscan()function. - Find the
if result:block. This is where the magic happens. We’re going to add a check to see if the object we hit (collider) has atake_damagemethod.
# Modify the 'if result:' block in fire_hitscan() in WeaponEquipped.gd
if result:
    var collider = result.collider
    var hit_point = result.position
    var hit_normal = result.normal

    _spawn_impact_effect(hit_point, hit_normal, collider)

    # --- THIS IS THE NEW LOGIC ---
    # We check if the object we hit knows how to "take_damage".
    # This is a beautifully decoupled way to handle damage. The weapon doesn't
    # care if it's a player, an enemy, or an explosive barrel.
    if collider and collider.has_method("take_damage"):
        collider.take_damage(weapon_data.damage)
    # --- END NEW LOGIC ---

deal_damage.emit(weapon_data.damage, hit_point, hit_normal, collider)And that’s it! Our weapons system is now damage-ready. It will now deal its weapon_data.damage value to any object that has a take_damage(amount: int) function.
Giving the Player a Mortal Coil
Now, let’s add the Health component to our player and script the death sequence.
- Open
Player.tscn. - Add a generic
Nodeas a child of the rootPlayernode. Name itHealth. - Attach your new
Health.gdscript to thisHealthnode. - With the
Healthnode selected, set itsInitial Max Healthin the Inspector to100. - Open
PlayerController.gd. We need to add a reference to the component and create the logic for what happens on death.- Add the export variable for the component.
# Add to PlayerController.gd under the @export_group("Components")
@export var health_component: HealthAdd a new state variable at the top of the script.
# Add near the top of PlayerController.gd
var is_dead = falseIn the _ready() function, connect to the Health component’s signals.
# Add to _ready() in PlayerController.gd
if health_component:
health_component.died.connect(_on_player_died)Create the public take_damage method. This is the function our weapon’s raycast will be looking for. It acts as a middleman, passing the damage to the Health component.
# Add this function to PlayerController.gd
func take_damage(amount: int) -> void:
    if health_component and not is_dead:
health_component.take_damage(amount)Create the _on_player_died() function. This is our “Game Over” sequence.
# Add this function to the end of PlayerController.gd
func _on_player_died() -> void:
    print("Player has died!")
    is_dead = true

    # Release the mouse so the player can use their cursor
    Input.set_mouse_mode(Input.MOUSE_MODE_VISIBLE)

    # Disable weapons
    if weapons_manager:
        weapons_manager.set_process_mode(Node.PROCESS_MODE_DISABLED)

    # A simple tween to make the player "fall over"
    var death_tween = create_tween()
death_tween.tween_property(head, "rotation:x", deg_to_rad(-90), 1.0)Finally, we need to stop the player from moving or looking around after they die. Add this check at the very top of both _input(event) and _physics_process(delta).
# Add as the first line in _input() and _physics_process()
if is_dead:
returnLast step for the player: Go back to Player.tscn, select the root Player node, and drag your Health node from the scene tree into the Health Component slot in the Inspector.
Making the Enemy Defeatable
We’ll follow the exact same process for the enemy, reinforcing the power of reusable components.
- Open
Enemy.tscn. - Add a
Nodechild to the root, name itHealth, and attachHealth.gd. Set itsInitial Max Healthto something like50. - Open
EnemyController.gd.- Add the export variable and the state variable.
# Add to EnemyController.gd
@export var health_component: Health
var is_dead = falseIn _ready(), connect the signal.
# Add to _ready() in EnemyController.gd
if health_component:
health_component.died.connect(_on_enemy_died)Add the public take_damage method.
# Add to EnemyController.gd
func take_damage(amount: int):
	if health_component and not is_dead:
		health_component.take_damage(amount)
	# If shot while not in combat, instantly become alert and know player's position
	if current_state != State.COMBAT:
		var players = get_tree().get_nodes_in_group("players")
		if not players.is_empty():
			last_known_player_position = players[0].global_position
_transition_to_state(State.ALERT)Create the _on_enemy_died() function.
# Add to EnemyController.gd
func _on_enemy_died():
	print("Enemy %s has died!" % name)
	is_dead = true
	current_state = null # Prevents further logic execution

	# Disable AI components
	nav_agent.set_process_mode(Node.PROCESS_MODE_DISABLED)
	if weapons_manager:
		weapons_manager.set_process_mode(Node.PROCESS_MODE_DISABLED)

	# Start death animation
	_start_death_animation()

func _on_health_changed(current_health: int, max_health: int):
	print("Enemy %s health: %d/%d" % [name, current_health, max_health])

func _start_death_animation():
	# Create death animation - fall to ground and disappear after delay
	var death_tween = create_tween()
	death_tween.set_parallel(true)

	# Fall backward
	death_tween.tween_property(self, "rotation:x", deg_to_rad(-90), 1.0)

	# After falling, wait and then fade out
	death_tween.chain().tween_interval(3.0)
	death_tween.chain().tween_callback(queue_free)

	func _die():
passAdd the is_dead check at the top of _physics_process(delta).
# Add as the first line in _physics_process() in EnemyController.gd
	if is_dead:
		# Dead enemy physics - stop all movement and just apply gravity
		velocity.x = 0
		velocity.z = 0
		if not is_on_floor():
			velocity.y -= gravity * delta
		move_and_slide()
returnGo back to Enemy.tscn, select the root Enemy node, and drag the Health node into the Health Component slot in the Inspector.
The Grand Finale That’s it. The loop is complete.
Go back to your Level.tscn and press F5 to run the game.
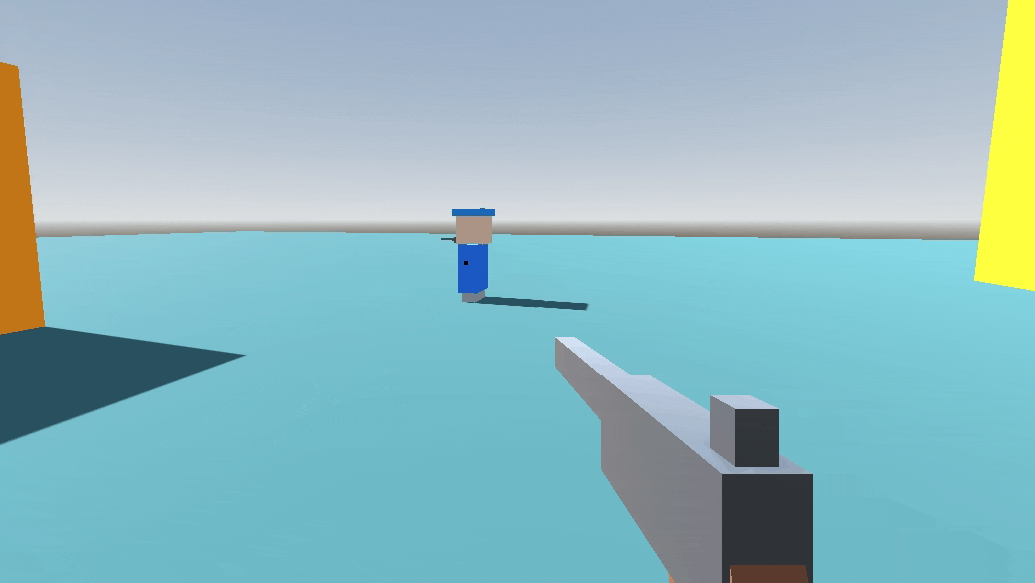
Find your enemy. When you shoot it, you’ll see its health decreasing in the output log. After a few shots, it will stop moving and its collision will disable, causing it to fall through the world—a simple but effective death.
Be careful, though. The enemy is shooting back now, and if you take too many hits, your controls will lock, your view will fall to the floor, and your mouse cursor will reappear. Game over.
In next part, we will use some particle-based VFX for hit impact effects & will also add muzzle flash.
2 responses to “Adding Health, Damage & Death (FPS Series Part 7)”
Hi, I’m following your very interesting tutorial, but I’m having a problem with the enemy. When he sees me, he chases me but doesn’t shoot. Can you tell me how to fix it?
Hi, there could be many reasons. He might not have a weapon attached in its array. Raycast might not have been hitting. And so on. We’ll need to debug it more to figure out.