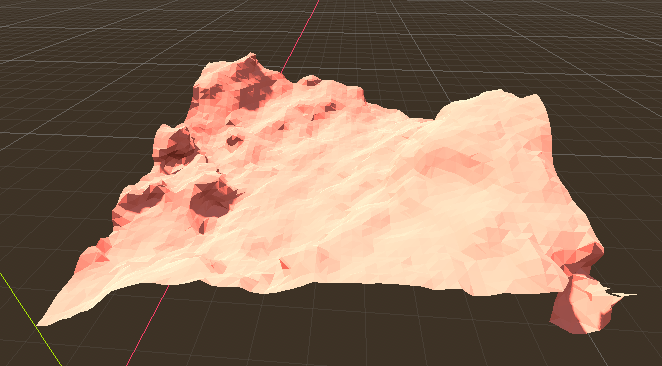
A simple heightmap-based terrain works well for simple geometries in procedural generation, but when we have to make structures that should grow in any dimension, such as caves, cliffs, rocks; we need a better algorithm.
For this the marching cube is a go-to algorithm but in my case, it was too slow for my game but yielded much better results. This algorithm is used to create 3D mesh from noise (or any math function). For this, we represent our function in scalar field and pass the scalar field to the algorithm.
What is Scalar Field?
Scalar field is just assigning of number values to every point in space.
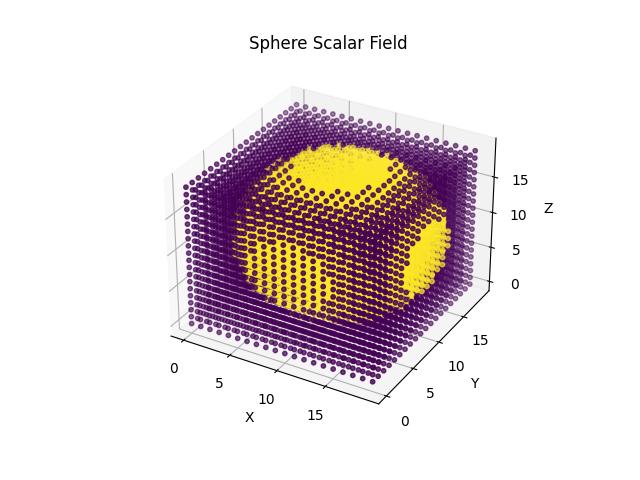
The scalar field is just an output of a function at some position. Typically, when we sample Perlin noise at positions (x, y, z), it returns a float value. This is a scalar field since we always have one value associated with every point in space.
The values of a scalar field can be in any range. In most cases, it is in range(1.0, -1.0) with 0.0 being the middle point. However, it can be in range(0.0, 1.0) or any other.
2D scalar field also exists. A heightmap is a typical example.
The Algorithm
Overview
Now that we have a scalar field in input. We can take any particular value as a threshold, such that all points having value less than threshold value will be considered inside the surface and those with values more than the threshold will be considered outside the surface.
We will later use this information to generate an actual surface.
Process
- Make a 3D grid (voxelize the space).
- For each cell in the grid:
- Check the scalar value at all 8 corners
- Create a surface within that cube/cell such that the surface is above inside vertices and below outside vertices.
How ‘exactly’ to create a surface?
Since cube is a simple structure with 8 corners, it only has 2^8 = 256 possible combinations of geometry. We pre-define all the combinations in a table, and during the course of algorithm, we just check which combination is applicable based on the current cell’s 8 corner values.

Implementing Marching Cubes in Godot Engine
Making a 3D Grid (Voxel)
We start by defining our voxel grid, to run the algorithm on it.
class VoxelGrid:
	var data: PackedFloat32Array
	var resolution: int

	func _init(resolution: int):
		self.resolution = resolution
		self.data.resize(resolution*resolution*resolution)
		self.data.fill(1.0)

	func read(x: int, y: int, z: int):
		return self.data[x + self.resolution * (y + self.resolution * z)]

	func write(x: int, y: int, z: int, value: float):
		self.data[x + self.resolution * (y + self.resolution * z)] = value
The given code is in GDScript, which does not support 2D or 3D arrays. That’s why we are using a 1D array with functions read(x, y, z) and write(x, y, z, value) to get/set the value at proper index. In a language such as C, the grid code will be much simpler:
const int GRID_SIZE = 100;

typedef struct VoxelGrid {
    float data[GRID_SIZE][GRID_SIZE][GRID_SIZE];
} VoxelGrid;

// grid->data[x][y][z] = my_float_value;
Creating Scalar Field
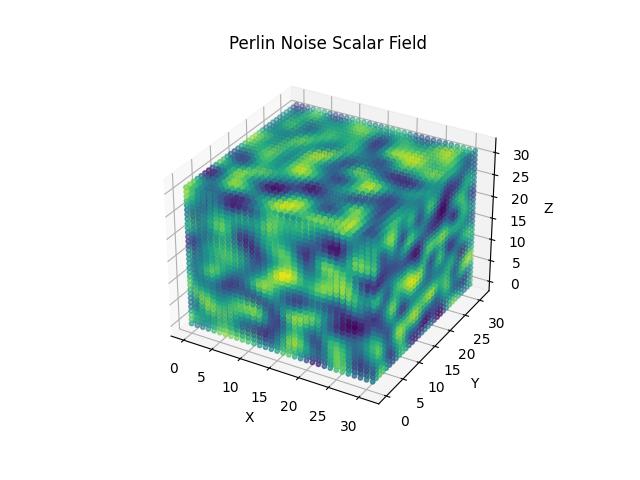
Here I am creating a Perlin-noise based scalar field, which generates values between (-1.0, 1.0). We will loop over each point in the grid, and assign a float value from Perlin noise to it.
func generate():
	var voxel_grid = VoxelGrid.new(RESOLUTION)

	# Create Scalar Field
	for x in range(voxel_grid.resolution):
		for y in range(voxel_grid.resolution):
			for z in range(voxel_grid.resolution):
				var value = NOISE.get_noise_3d(x, y, z)
				voxel_grid.write(x, y, z, value)
Marching the Cubes
We need to loop over each cell of the grid. On each cell, we will call march_cube() function, which adds some vertices to the vertices array. These vertices will later be used to create faces.
func generate():
  ...
  # Marching the Cubes
	var vertices = PackedVector3Array()
	for x in voxel_grid.resolution-1:
		for y in voxel_grid.resolution-1:
			for z in voxel_grid.resolution-1:
				march_cube(x, y, z, voxel_grid, vertices)
On Each Cube
The march_cube() function does the actual generation of vertices or geometry.
What is Triangulation Table?
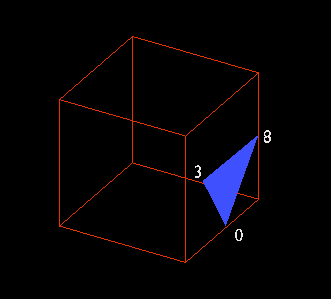
The set of all possible combinations of geometry are defined in a table called triangulation table (see this). Each value in the triangulation table represents an edge. If we have edge number, we can easily get the two vertices that form that edge.
The triangulation table holds a list of edges for every configuration of geometry. For example, a value of [0, 8, 3, -1, -1, …] means that there exists a face with three vertices, one on edge 0, another on edge 8, and another on edge 3.
The algorithm checks the scalar values at each of the 8 corners of the cube & checks the triangulation table of what configuration (or what set of edges) are there to form vertices on. In other words, it checks for all the vertices that are below the surface & should be hided from those above the surface.
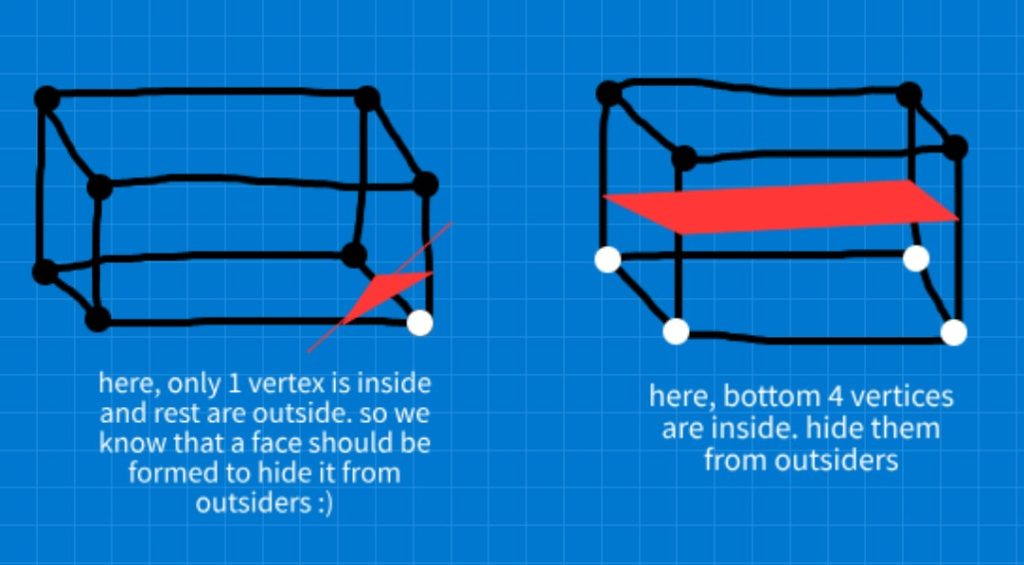
“The thing to note here is that, the geometry we create have its vertices on the edges of the cube. These edges come from the triangulation table, for each possible geometry.“
How Vertices are Created?
When we get list of edges. For each edge, we get the two vertices connecting it; and we create our mesh’s vertex in between. It is simple since by definition, an edge is an index on an array representing a pair of two numbers, which are the indexes of vertices in vertex array.
By interpolating between the two vertex positions, our mesh’s vertex position is finalized.
func march_cube(x:int, y:int, z:int, voxel_grid:VoxelGrid, vertices:PackedVector3Array):
  # Get the correct configuration
	var tri = get_triangulation(x, y, z, voxel_grid)
	for edge_index in tri:
		if edge_index < 0: break
		# Get edge
		var point_indices = EDGES[edge_index]
		# Get 2 points connecting this edge
		var p0 = POINTS[point_indices.x]
		var p1 = POINTS[point_indices.y]
		# Global position of these 2 points
		var pos_a = Vector3(x+p0.x, y+p0.y, z+p0.z)
		var pos_b = Vector3(x+p1.x, y+p1.y, z+p1.z)
		# Interpolate between these 2 points to get our mesh's vertex position
		var position = calculate_interpolation(pos_a, pos_b, voxel_grid)
		# Add our new vertex to our mesh's vertces array
		vertices.append(position)
The rest of the functions & variables are helper functions. I’ll explain them a bit.
Helper Functions Defined
# Vertices of a cube
const POINTS = [
	Vector3i(0, 0, 0),
	Vector3i(0, 0, 1),
	Vector3i(1, 0, 1),
	Vector3i(1, 0, 0),
	Vector3i(0, 1, 0),
	Vector3i(0, 1, 1),
	Vector3i(1, 1, 1),
	Vector3i(1, 1, 0),
]

# Each edge represents pair of 2 vertices. EDGES[0] represents
# first and second vertex in POINTS array.
const EDGES = [
	Vector2i(0, 1),
	Vector2i(1, 2),
	Vector2i(2, 3),
	Vector2i(3, 0),
	Vector2i(4, 5),
	Vector2i(5, 6),
	Vector2i(6, 7),
	Vector2i(7, 4),
	Vector2i(0, 4),
	Vector2i(1, 5),
	Vector2i(2, 6),
	Vector2i(3, 7),
]

# Tri table to store all 256 combinations of geometry in
# the form of edges through which our geometry cuts
const TRIANGULATIONS = [
[-1, -1, -1, -1, -1, -1, -1, -1, -1, -1, -1, -1, -1, -1, -1, -1],
[0, 8, 3, -1, -1, -1, -1, -1, -1, -1, -1, -1, -1, -1, -1, -1],
[0, 1, 9, -1, -1, -1, -1, -1, -1, -1, -1, -1, -1, -1, -1, -1],
...
...
... + 252 more rows (see github repo)
]

# For each position x,y,z; if the scalar value is below
# the surface/ISO_LEVEL, add its contribution to the index
# eventually, idx will be the index of the correct value
# in triangulation table.
func get_triangulation(x:int, y:int, z:int, voxel_grid:VoxelGrid):
	var idx = 0b00000000
	idx |= int(voxel_grid.read(x, y, z) < ISO_LEVEL)<<0
	idx |= int(voxel_grid.read(x, y, z+1) < ISO_LEVEL)<<1
	idx |= int(voxel_grid.read(x+1, y, z+1) < ISO_LEVEL)<<2
	idx |= int(voxel_grid.read(x+1, y, z) < ISO_LEVEL)<<3
	idx |= int(voxel_grid.read(x, y+1, z) < ISO_LEVEL)<<4
	idx |= int(voxel_grid.read(x, y+1, z+1) < ISO_LEVEL)<<5
	idx |= int(voxel_grid.read(x+1, y+1, z+1) < ISO_LEVEL)<<6
	idx |= int(voxel_grid.read(x+1, y+1, z) < ISO_LEVEL)<<7
	return TRIANGULATIONS[idx]

# Interpolate between the two vertices to place our new vertex in between
func calculate_interpolation(a:Vector3, b:Vector3, voxel_grid:VoxelGrid):
	var val_a = voxel_grid.read(a.x, a.y, a.z)
	var val_b = voxel_grid.read(b.x, b.y, b.z)
	var t = (ISO_LEVEL - val_a)/(val_b-val_a)
	return a+t*(b-a)
Generating Mesh
After the algorithm has run, we will have an array of vertices. We can use Godot’s SurfaceTool & MeshDataTool to create geometry.
In generate() function above, add the following code:
def generate():
  ...
  ...

  # Create mesh surface and draw
	var surface_tool = SurfaceTool.new()
	surface_tool.begin(Mesh.PRIMITIVE_TRIANGLES)

	if FLAT_SHADED:
		surface_tool.set_smooth_group(-1)

	for vert in vertices:
		surface_tool.add_vertex(vert)

	surface_tool.generate_normals()
	surface_tool.index()
	surface_tool.set_material(MATERIAL)
	mesh = surface_tool.commit()
Making in Chunks
For large terrains, we typically make it in chunks. We have to keep track of player position and generate chunks around player and remove them when player gets away. Following is the system I implemented for this purpose.
extends Node3D

const CHUNK_SIZE = 8  # Size of each chunk
const RENDER_DISTANCE = 1  # Number of chunks to render around the player

var player_position = Vector3()  # Player position
var loaded_chunks = {}  # Dictionary to store loaded chunks

var noise: FastNoiseLite

func _ready():
	noise = FastNoiseLite.new()

func _process(delta):
	# Update player position (you need to implement this part)
	# For demonstration, we're assuming player moves along x and z axes
	player_position = $player.global_transform.origin

	# Calculate player chunk position
	var player_chunk_x = int(player_position.x / CHUNK_SIZE)
	var player_chunk_z = int(player_position.z / CHUNK_SIZE)

	# Load and unload chunks based on player position
	for x in range(player_chunk_x - RENDER_DISTANCE, player_chunk_x + RENDER_DISTANCE + 1):
		for z in range(player_chunk_z - RENDER_DISTANCE, player_chunk_z + RENDER_DISTANCE + 1):
			var chunk_key = str(x) + "," + str(z)
			if not loaded_chunks.has(chunk_key):
				print("x: "+str(x)+"z: "+str(z))
				load_chunk(x, z)
			else:
				# Update chunk position if it's already loaded
				loaded_chunks[chunk_key].position.x = x * CHUNK_SIZE
				loaded_chunks[chunk_key].position.z = z * CHUNK_SIZE

	# Unload chunks that are out of render distance
	for key in loaded_chunks.keys():
		var coords = key.split(",")
		var chunk_x = int(coords[0])
		var chunk_z = int(coords[1])
		if abs(chunk_x - player_chunk_x) > RENDER_DISTANCE or abs(chunk_z - player_chunk_z) > RENDER_DISTANCE:
			unload_chunk(chunk_x, chunk_z)

func load_chunk(x, z):
	var chunk_mesh = generate_chunk_mesh(x, z)
	var chunk_instance = MeshInstance3D.new()
	chunk_instance.mesh = chunk_mesh
	chunk_instance.position.x = x * CHUNK_SIZE
	chunk_instance.position.z = z * CHUNK_SIZE
	add_child(chunk_instance)
	loaded_chunks[str(x) + "," + str(z)] = chunk_instance

func unload_chunk(x, z):
	var chunk_key = str(x) + "," + str(z)
	if loaded_chunks.has(chunk_key):
		var chunk_instance = loaded_chunks[chunk_key]
		chunk_instance.queue_free()
		loaded_chunks.erase(chunk_key)
		print('UNLOAD CHNK')

func generate_chunk_mesh(x, z):
	# call generate function from above marching cubes algorithm
	var mesh = generate(Vector3(x, 0, z) * CHUNK_SIZE)
	return mesh
Also, in generate() function of marching cube, make sure to input chunk position, so it becomes: generate(chunk_pos: Vector3) where chunk_pos is chunk position in chunk-space (chunk-space position is chunk’s original position divided by CHUNK_SIZE.
And when assigning noise to scalar field, nmake sure to do:
# DO:
var value = NOISE.get_noise_3d(x + chunk_pos.x, y + chunk_pos.y, z + chunk_pos.z)
# and NOT:
var value = NOISE.get_noise_3d(x, y, z)
Optimizing the Algorithm
Keep the space for marching cube low . If maximum height is never more than 16, and chunk sizes are 64×64, then just make scalar field of size (64, 16, 64) instead of (64,64,64); this will drastically reduce the space that algorithm has to iterate over. Current implementation does not take care of it, instead, it currently loops like this (inefficient if whole cubical region is not required to iterate):
for x in range(voxel_grid.resolution): # chunk x width
		for y in range(voxel_grid.resolution): # keep it <= MAX_HEIGHT
			for z in range(voxel_grid.resolution): # chunk z width
Use separate threads for chunk making.
Full Godot Code
- The complete working implementation for Godot is here. Thanks to original author GitHub @jbernardic.