This post is part of Godot FPS tutorial series.
We’ve built a complete combat loop with weapons, AI, and health, but our player is flying blind. They have no way of knowing their health status or how much ammo is left in their revolver without checking the output log. It’s time to give our player the critical information they need with a proper Heads-Up Display (HUD).
In this tutorial, we will build a complete UI layer from the ground up.
Our objectives:
- Create a Dynamic Crosshair: We’ll build a crosshair that isn’t just a static image, but a dynamically drawn element that can expand with weapon recoil, providing direct visual feedback for accuracy.
- Design the HUD Scene: Using Godot’s control nodes, we’ll design a clean interface to display player health and weapon ammunition.
- Script the HUD Logic: We’ll write the code that allows the HUD to receive data from the game world and update its elements with smooth animations.
- Integrate with Existing Systems: We’ll hook up our
PlayerController,WeaponManager, andInteractorto the new UI, replacing all our oldprint()statements with real, on-screen updates.
By the end of this tutorial, you will have a professional-looking and highly functional HUD that makes the game significantly more playable and polished.
Before you begin the UI part, make sure to move the UI folder from this GitHub repo to your project folder. It has all the system setup already (with crosshair).
The CrosshairData Resource
Just like our weapons, we want our crosshairs to be data-driven. This will allow each weapon to have its own unique crosshair style without any extra coding.
- Go to folder:
UI/Crosshairs/Data. - There you can see a script named
CrosshairData.gd. This resource will hold data for all types of unique crosshairs.
# CrosshairData.gd
class_name CrosshairData
extends Resource


@export_group("General Appearance")
@export var crosshair_type: CrosshairDrawer.CrosshairType = CrosshairDrawer.CrosshairType.PLUS
@export var color: Color = Color.GOLDENROD
@export var line_thickness: float = 2.0

@export_group("Sizing & Dynamics")
@export var base_size: int = 10 # Length of lines or radius of circle
@export var max_recoil_multiplier: float = 5.0 # How much it expands
@export var plus_gap: int = 5 # Gap for the 'PLUS' type
The CrosshairDrawer Script
This is the control node that will read a CrosshairData resource and actually draw the crosshair on screen using Godot’s 2D drawing functions.
- In the
UI/Crosshairsfolder, you can find a script namedCrosshairDrawer.gd.
# CrosshairDrawer.gd
@tool
class_name CrosshairDrawer
extends Control

enum CrosshairType { PLUS, CIRCLE, CROSS }

@export var crosshair_type: CrosshairType = CrosshairType.PLUS: set = _set_and_redraw
@export var color: Color = Color.WHITE: set = _set_and_redraw
@export var line_thickness: float = 2.0: set = _set_and_redraw
@export var base_size: int = 10: set = _set_and_redraw
@export var max_recoil_multiplier: float = 5.0: set = _set_and_redraw
@export var plus_gap: int = 5: set = _set_and_redraw

@export_range(0.0, 1.0, 0.01) var recoil: float = 0.0:
	set(value):
		recoil = clampf(value, 0.0, 1.0)
		queue_redraw()

func _set_and_redraw(value):
	# Helper to avoid repeating queue_redraw() for every variable.
	# Note: This won't work in GDScript 2.0 as `set` doesn't pass the property name.
	# We are writing it this way for simplicity in this tutorial.
	queue_redraw()

func _process(delta):
	# Slowly reduce recoil over time for a smooth recovery animation.
	if recoil > 0:
		recoil = move_toward(recoil, 0, delta * 2.0) # Recover in 0.5 seconds

func _draw():
	var center: Vector2 = size / 2.0
	var spread: float = lerp(0.0, float(base_size * max_recoil_multiplier), recoil)

	match crosshair_type:
		CrosshairType.PLUS:
			var current_gap = plus_gap + spread
			# Top
			draw_line(center + Vector2(0, -current_gap), center + Vector2(0, -current_gap - base_size), color, line_thickness)
			# Bottom
			draw_line(center + Vector2(0, current_gap), center + Vector2(0, current_gap + base_size), color, line_thickness)
			# Left
			draw_line(center + Vector2(-current_gap, 0), center + Vector2(-current_gap - base_size, 0), color, line_thickness)
			# Right
			draw_line(center + Vector2(current_gap, 0), center + Vector2(current_gap + base_size, 0), color, line_thickness)

## Applies a CrosshairData resource to this node, updating its appearance.
func apply_data(data: CrosshairData):
	if not data:
		visible = false
		return

	visible = true
	self.crosshair_type = data.crosshair_type
	self.color = data.color
	self.line_thickness = data.line_thickness
	self.base_size = data.base_size
	self.max_recoil_multiplier = data.max_recoil_multiplier
	self.plus_gap = data.plus_gap
Designing the HUD Scene
You can find HUD scene with its script under the same /UI folder we downloaded above.
HUD.gd Explanation
The HUD.gd script will act as the public API for our UI. Other game systems will call functions on this script to update the display.
- Open
HUD.gdand analyze its key functions:_ready(): It adds itself to the"game-ui"group. This is how other scripts will find it easily.update_health(): Takes health values and uses aTweento smoothly animate the health bar, creating a polished effect.update_weapon(): Updates the ammo text. It uses aTweento make the ammo count “pop” when it changes.show_prompt()/hide_prompt(): Fades the interaction prompt in and out smoothly.
Integrating Everything
This is where we connect the dots and replace our old print() statements.
Add the HUD to the Level
- Open
Level.tscn. - Instance your new
HUD.tscnas a child of the rootLevelnode. That’s it. Because it’s aCanvasLayer, it will automatically draw on top of everything.
Configure Weapon Crosshairs
- First, let’s create a crosshair preset. In
UI/Crosshairs/Data, right-click -> New -> Resource… and selectCrosshairData. Save it asplus.tres. Configure it in the Inspector to your liking. - Open
WeaponData.gd. Add the export for the crosshair data.
# Add to WeaponData.gd
@export_group("Visuals")
@export var crosshair_data: CrosshairData- Open
revolver.tres. You’ll see the newCrosshair Dataslot. Drag yourplus.tresresource into it. - Open
WeaponManager.gd. In theswitch_weaponfunction, add the code to tell the UI to apply the new weapon’s crosshair data.
# Add to the end of switch_weapon() in WeaponManager.gd
# This assumes the HUD scene has been added to the "game-ui" group
var game_ui = get_tree().get_first_node_in_group("game-ui")
if game_ui and current_weapon_instance.weapon_data.crosshair_data:
game_ui.crosshair.apply_data(current_weapon_instance.weapon_data.crosshair_data)Open WeaponEquipped.gd. We need to tell the crosshair to “kick” when we fire.
# Add to the apply_recoil() function in WeaponEquipped.gd
func apply_recoil(kickback_amount: float, rotation_kick_degrees: Vector3):
    # ... (existing recoil logic) ...

    # --- ADD THIS ---
    var game_ui = get_tree().get_first_node_in_group("game-ui")
    if game_ui:
        # Add a burst of recoil to the crosshair
        game_ui.crosshair.recoil += 0.5
# ----------------Connect Player and Weapon Manager to the HUD
- Open
PlayerController.gd. - Find the
_ready()function. We need to connect thehealth_componentandweapons_managersignals to the HUD. Replace any oldprintconnections with these.
# In _ready() in PlayerController.gd

# Connect to the manager's signal
if weapons_manager:
    weapons_manager.weapon_ammo_changed.connect(_on_weapon_ammo_changed)

# Connect health system signals
if health_component:
    health_component.health_changed.connect(_on_health_changed)
    # Initialize the HUD with starting health
    var game_ui = get_tree().get_first_node_in_group("game-ui")
    if game_ui:
game_ui.update_health(health_component.current_health, health_component.max_health, false)Now, update the signal handler functions at the end of PlayerController.gd.
# Replace the old functions at the end of PlayerController.gd

func _on_weapon_ammo_changed(current_magazine: int, total_ammo: int):
    var game_ui = get_tree().get_first_node_in_group("game-ui")
    if game_ui and weapons_manager.current_weapon_instance:
        game_ui.update_weapon(
            weapons_manager.current_weapon_instance.weapon_data.weapon_name,
            current_magazine,
            total_ammo
        )

func _on_health_changed(current_health: int, max_health: int):
    var game_ui = get_tree().get_first_node_in_group("game-ui")
    if game_ui:
game_ui.update_health(current_health, max_health)Finally, let’s hook up the interaction prompts. Find the _on_interactor_detected and _on_interactor_lost functions and replace their print statements.
# Replace the interactor functions in PlayerController.gd

func _on_interactor_detected(interactable: Interactable) -> void:
    get_tree().get_first_node_in_group("game-ui").show_prompt(interactable.interaction_prompt)

func _on_interactor_lost() -> void:
get_tree().get_first_node_in_group("game-ui").hide_prompt()One last crucial connection: In WeaponManager.gd, the switch_weapon function needs to emit the weapon_ammo_changed signal to update the UI when you switch to a gun with a different ammo count.
# Add to the end of switch_weapon(), right after setting current_weapon_instance
if current_weapon_instance:
    # ... (existing logic) ...
    var ammo_info = current_weapon_instance.get_ammo_info()
weapon_ammo_changed.emit(ammo_info.magazine, ammo_info.total)Also add this signal on top of WeaponManager.gd:
signal weapon_ammo_changed(magzine, total)Also add this to WeaponEquipped.gd to allow us to get the weapon’s info when required:
func get_ammo_info() -> Dictionary:
	if not weapon_data:
		return {}
	return {
		"magazine": weapon_data.current_magazine_ammo,
		"total": weapon_data.total_ammo,
		"max_magazine": weapon_data.max_magazine_capacity,
		"max_total": weapon_data.max_total_ammo,
		"is_reloading": weapon_data.is_reloading
}Mission Complete
Run the game. The difference will be night and day.
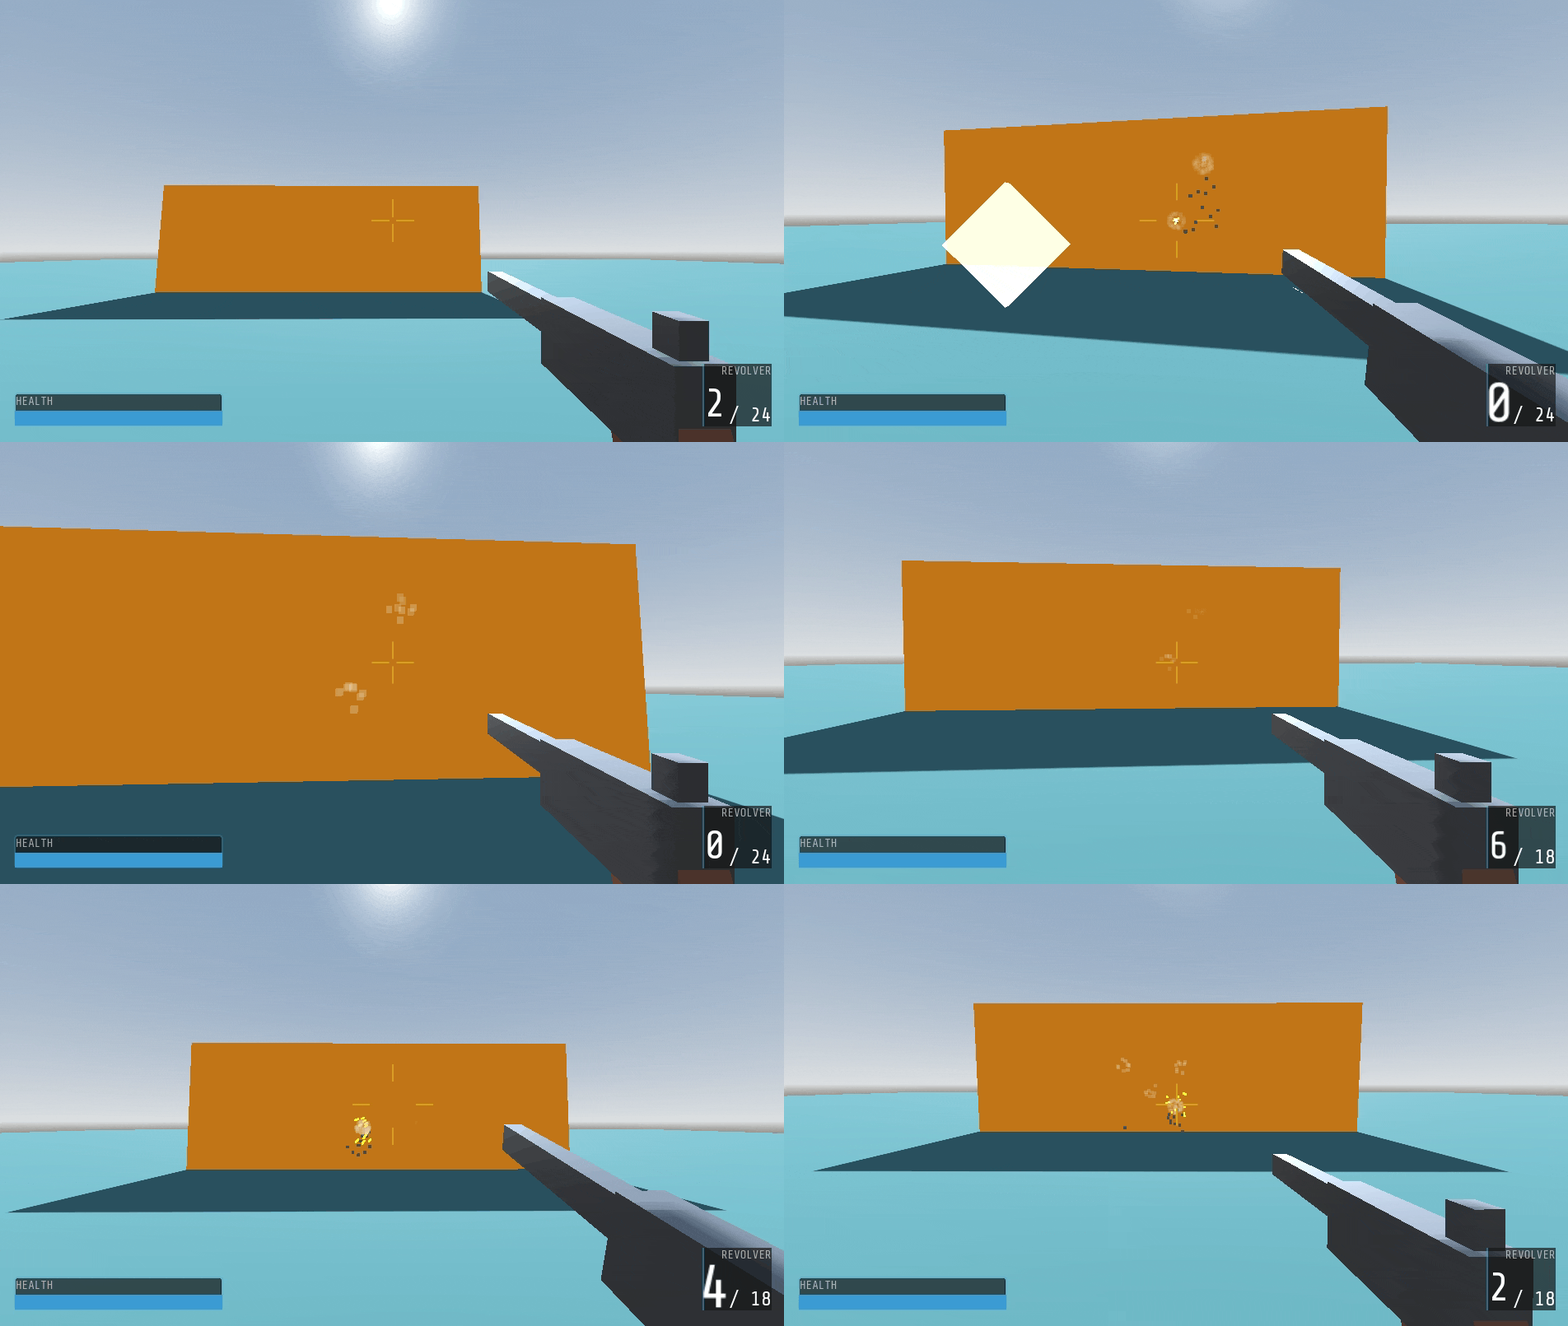
- You now have a dynamic crosshair that kicks when you fire.
- Your health bar is visible in the bottom-left and animates when you take damage.
- Your revolver’s name and ammo count are displayed in the bottom-right and “pop” when you reload or switch weapons.
- Walking up to a thrown weapon or the alarm now shows a clean interaction prompt in the center of the screen.
You have successfully built and integrated a HUD. This marks the end of our core mechanics tutorials. In next part, we will extend it by adding melee weapon.

