Sci fi engine thruster VFX shader for Godot 4. Jet engine exhaust flame/propulsion.
Breakdown
- Initially I made a gradient on object, making one end of object transparent and other end opaque.
- Then I applied noise texture, thus making the transition a bit rough.
- Then I animated the UVs and modified the intensity of colors at different levels.
- Finally, I applied a Fresnel effect on edges so they don’t look sharp.
We will start with the simple effect, and will add details to it with time.
Start with Simple Gradient
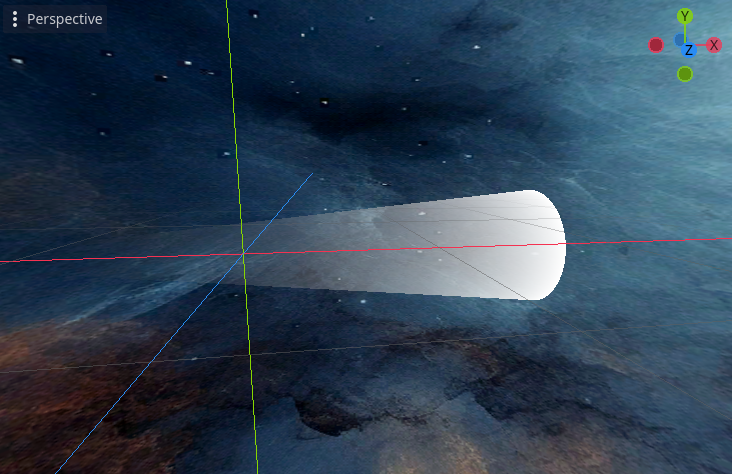
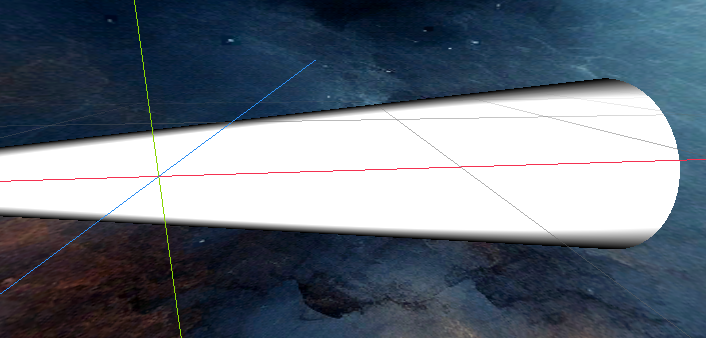
The first step is to make a gradient spanning across the mesh. One end of the mesh should be transparent (its ALPHA = 0.0) and other end must have ALPHA value 1.0.
This is how it looks:
Code:
uniform float model_height = 3.0;
uniform float dissolve_start : hint_range(0.0, 1.0) = 0.001;
uniform float dissolve_length : hint_range(0.0, 1.0) = 1.0;
uniform float gradient_bias : hint_range(0.1, 5.0) = 1.0;

varying float vert_height;
varying vec2 v_uv;

void vertex() {
    vert_height = (VERTEX.y + (model_height / 2.0)) / model_height;
    v_uv = UV;
}

void fragment(){
    float gradient_height = vert_height - dissolve_start;
    gradient_height *= 1.0 / dissolve_length;
    gradient_height = clamp(pow(gradient_height, gradient_bias), 0.0, 1.0);
}

  ALPHA = mix(1.0, 0.0, gradient_height);
  ALBEDO = vec3(1.0 - gradient_height);
}
The vertex shader calculates vert_height, which is the vertical position of each vertex normalized between 0 and 1. The calculation vert_height = (VERTEX.y + (model_height / 2.0)) / model_height; ensures that the bottom vertex is at 0 and the top vertex is at 1.
In fragment shader, gradient_height is computed by taking the vert_height, subtracting dissolve_start (to begin the effect partway up the model), and then dividing by dissolve_length to scale the effect over the desired portion of the model.
gradient_height is then modified using pow(gradient_height, gradient_bias) to apply a bias to the gradient, which adjusts how sharply or smoothly the dissolve happens. Finally, these values are assigned to visualize the effect.
Adding noise to make it interesting
The above jet engine like effect is sufficient for some games, but I needed something more interesting, so I added the contribution of noise to make it more detailed. It is simple, just add a noise sampler2D and add its value to gradient to distort the gradient.
// ADD THESE UNIFORMS:
uniform float noise_speed = 1.0; // Speed of noise movement
uniform float noise_strength = 0.1; // Strength of the noise effect
uniform float stretch_factor = 0.6; // Factor to stretch the noise
uniform sampler2D noise_texture; // Noise texture
// THEN IN fragment():
// ADD (on top):
float time = TIME * noise_speed;
vec2 moving_uv = v_uv + noise_direction * time;
vec2 stretched_uv = vec2(moving_uv.x, moving_uv.y * stretch_factor);
float noise_value = texture(noise_texture, stretched_uv).r * noise_strength;
// AND THEN:
// REPLACE:
gradient_height = clamp(pow(gradient_height, gradient_bias), 0.0, 1.0);
// WITH THIS:
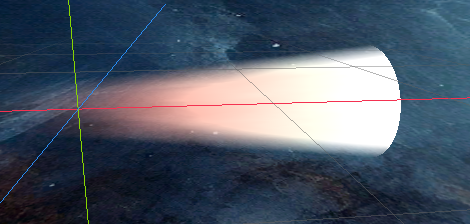
gradient_height = clamp(pow(gradient_height, gradient_bias) + noise_value, 0.0, 1.0);The noise was static, so it was animated from one end to the other by moving the UVs with time. Also, UVs were stretched in one direction by multiplying it with a uniform variable stretch_factor.
This is how it looks so far:
Adding Colors
Now we replace the boring gradient color with our custon color that we assign as uniform. For this, create a new uniform variable of vec3 type and call it _color. Next assign it to ALBEDO like this:
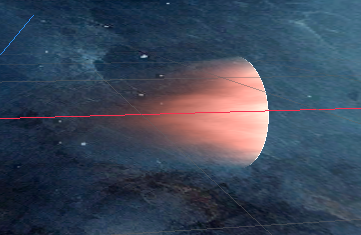
ALBEDO = neon(pow(ALPHA, power_factor), _color);But wait, note that I have used a neon() function instead of directly assigning the color. This is because neon function intensifies the color and makes it look more like flame. Directly assigning will make it look dull.
The neon function is simple:
vec3 neon(float value, vec3 color) {
    float ramp = clamp(value, 0.0, 1.0);
    vec3 output_color = vec3(0.0);
    ramp = ramp * ramp;
    output_color += pow(color, vec3(4.0)) * ramp;
    ramp = ramp * ramp;
    output_color += color * ramp;
    ramp = ramp * ramp;
    output_color += vec3(1.0) * ramp;
    return output_color;
}
Making edges smooth
Notice the sharp edges of cone above. We can easily remove them with a simple Fresnel function.
float fresnel(float amount, vec3 normal, vec3 view) {
    return pow((1.0 - clamp(dot(normalize(normal), normalize(view)), 0.0, 1.0)), amount);
}
This is how Fresnel function looks like (the darker regions have lower value (approaching 0.0) and brighter region have values approaching 1.0.
Now if we multiply the fresnel function with the ALPHA, we will get ends of the model as transparent, so edges will not be sharp. So lets calculate fresnel & multiply them:
// AT END OF fragment():
float fresnel_effect = 1.0 - fresnel(fresnel_factor, NORMAL, VIEW);
fresnel_effect = pow(fresnel_effect * fresnel_amplification, fresnel_power);

ALPHA *= fresnel_effect;
I have just amplified the fresnel to make it look right using the pow function with some variables that are uniforms. fresnel_effect, fresnel_amplification and fresnel_power are simple float type uniforms.
More
There are tons of controls to make jet thruster look better. You can play with the values to get what is desirable. For example:

Thank you for reading. Have a great day <3
11 responses to “Sci-fi Engine Thrust Shader”
Hey, just wanna say this is a nice tutorial. Something WRITTEN and not a video… I’d forgotten how nice that is sometimes.
Thank you!
Hey mujtaba, I love you but i spent about 4 hours on this tutorial and im not getting anywhere near close to your second step. I started with a cone and played around with the UV unwrap, default from blender, and then unwrapped around a long edge, the “noise_direction” doesnt really seem to have much say in this. I mostly get a rotating field around the cone rather than a longitudinal and fine “thrust”. I made a 3d vector for “noise_direction” but no ammount of control gets me closer.
This can be from a lot of things, but I dont want to bore you with all my troubles and experiments, I kindly as if you could please upload a scene containing your result and i can figure out the fine details.
PS. i recently started learing Godot, im very frustated :))
Hello I mailed the Godot project at your given yahoo email.
EDIT: In my opinion, your issue is due to UVs. I basically used Godot’s default cylinder mesh with radius of one end set to 0.0 to make it cone. It worked that way.
As a reference for everyone else, Mujtaba was very kind to forward the whole scene and i figured out indeed my issues were because of:
1. in GDShader you also need “render_mode unshaded;”
2. UV stretching (or twisting). Turns out you need parallel UV unwraping for the “long” faces; to get it working on a cone you need a truncated cone where the smaller face at the “tip” of the cone has its UV stretched to have parallel edges to the large base diameter. Then its a matter of playing with the “noise_direction” and 2Dnoise frequency.
Thanks.
Hello Mujtaba! First of all I love your shader, I was trying to achieve something similar to this, but I couldn’t. Regarding your tutorial I followed it step by step but I couldn’t reach the same result, could you please send me to my email the godot project with this shader working? Thanks in advance!
Hello. I mailed it.
It worked perfectly! and it looks awesome. I really encourage you to update this tutorial with all the changes in your shader. For example fragment() is a little bit different than tutorial and also specify this shader uses blend_mix, unshaded and cull_back render_mode. Overrall I think your job was perfect and the tutorial is very well explained though. Thank you for sharing this with the community
Hello, thanks for this beautiful shader. However the fresnel effect will also smooth the base of the cone, so it only looks good when viewed from the side, when we look into the thruster, the effect looks very different. is this intended ?
Hey guys, has anyone managed to get it working? I’m trying to tinker with it because it feels like a lot of the code is missing, but I can’t get it to work
I forgot to add `render_mode blend_mix, unshaded, cull_back;` – Besides, make sure to assign the texture in inspector and play with parameter values. – If shader does not compile (shows error), there might be some error in typo or something from my side.
Overall, concept is explained with code snippets covering almost every aspect of shader. The only reason why I cannot post whole code at bottom (as I often do for other tutorials) is because this shader was commissioned by a client and it is not ethical to publicly share it.